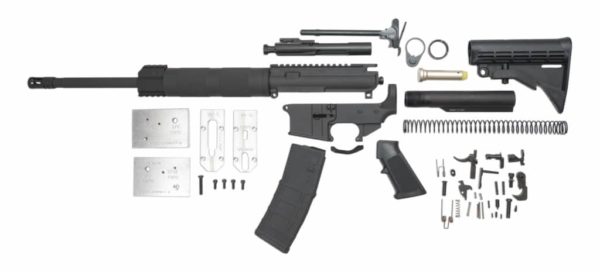
There’s a lot to consider when building an AR-15 rifle. Mostly because there are so many different options and purposes to which you can customize. Building an AR-15 rifle can be challenging and rewarding.
What do you want to use your AR-15 for?
Your first decision prior to building your rifle is to know what you want. Are you going to hunt varmints? Plink short range steel? Learn to shoot at long distance? Compete in 3 Gun competitions? It’s an incredibly flexible rifle platform that you can customize almost any way you want and you have the ability to truly “Make It Your Own! For Whatever You’re Into.”
Receivers are the first thing to consider when building an AR-15.
When you begin selecting rifle components and choosing the manufacturers, you want to start by finding a good upper and lower receiver combination. This is important for fit and function. Some of the Mil-Spec receivers will have enough variance to cause a poor fit. Often times the result is loose or binding components. So if possible, try to find a quality matched set from a US manufacturer.
When deciding on forged or billet, you may hear that forged is considered slightly stronger.
But don’t let that influence your decision on which one to get. You can shoot ten thousand rounds through either one, slam them both against granite boulders, and both will survive with no discernible difference. So a more important consideration should be the attributes you want the receivers to have. Do you want the forward assist? An ambi-bolt release? A flared trigger guard, or an ambi-mag release built into the lower?
You can also decide on either 6061 T6 or 7075 aluminum construction, both have positives.
7075 is slightly stronger, the other a little more malleable and corrosion resistant. Not a major consideration either way. That being said, you may want to rule out carbon fiber, polymer, or plastic blended receivers. The quality varies too much, due to inconsistent polymer fiber blending processes.
Choosing a barrel.
When choosing your barrel, there are basically a couple of choices with variations in the steel and hardening process. You will probably be deciding on the low alloy steel including 4140, 4150, or 4150-cmv, and chrome lined variants of each. Or you’ll choose the stainless steel barrel of 410, 416, or 416R variation. We’ll describe the characteristics of these later. The barrel forging will commonly consist of press forging which will produce a more uniform steel density barrel, and hammer forging that can create a more dense steel, but frequently with an uneven consistency throughout the barrel. Manufacturers will produce quality precision barrels from each of these methods.
With regard to rifling, the cut rifling method is typically a more expensive process used by most premier barrel makers and can lead to better precision rifling.
But not always, as this method is more difficult and will produce variations that cause a lower grade for the barrel after inspection. Button rifling is an easier and cheaper process, and can still produce good shooters. The bottom line tells us that quality machining, precision honing, and rifling processes are key to a barrels accuracy. Most of the time you get the accuracy you pay for. I wish this was always true, but we are all dependent on quality control. That’s why we sometimes get a pricey poor shooter, or an inexpensive great shooting barrel.
Ultimately you can target the qualities you have control over and get what you want from the barrel.
These include attributes for accuracy, weight, reliability and longevity. For example, the best precision qualities of forging, cut rifling, stainless steel, and heavy barrel profiles may give you the best accuracy, but of course, It’ll be heavier! Especially with a longer barrel. This may lead you to decide on fluting as a lighter option. A good chrome lined barrel may be preferably lighter, and less expensive, but they are often less accurate at longer distances due to uneven flow characteristics of chrome. This process sometimes results in a less stabilized bullet in flight. The chrome barrels will clean easier, often last longer, and still perform well, especially at the shorter distances. So this may be an option for you. Again, this goes back to what you want from your rifle.
Consider your barrel length.
Do you want a shorter, lighter barrel to maneuver over longer distances? Through steep, rough terrain and brush? Or do you want a longer barrel to help increase accuracy and velocity? For example opting for a 20” barrel can give you 250 fps velocity over a 16” barrel depending on your ammunition. But then again, do you want the extra weight and length to wield around for each small increase in velocity or accuracy? You may! Especially if you’re talking about going from a 14.5” to 22” barrel resulting in a dramatic difference in weight and length, as well as possibly 450 fps in velocity and potential for better accuracy.
More barrel considerations include the twist rates, rifling, and chambering.
Typically a medium twist rate around 1:8 or 1:9 is a good choice when you plan to shoot a variety of different bullet weights. By splitting the 1:7 to 1:11 recommended twist rates for the 55 to 80 grain bullets, you are averaging the optimum rate for bullet stabilization.
5r rifling (5 lands-grooves-right twist) is most common, but 4r and 6r have been used in variants with good results. 3P (Polygonal) is also an option with a couple of manufacturers. But, before saying one is best over the other, the fact is, they’re all capable of sub-moa performance when quality machining and rifling is performed. The most common chambering options include the 5.56, the .223 and .223 Wylde, with merits to each of these.
Bolt carrier group.
When you consider your BCG you will decide on an auto/ M16 style, or semi-auto group. Many prefer the slightly heavier M16 bolt carrier to slow down the action a little, which can create more reliable cycling. This actually all depends on the barrel length, gas porting, buffer weight, and spring. It’s all a concerted effort affecting the action, and you can balance out either type of bolt carrier group for the best reliable cycling. Once again depending on the components you select, neither is best, they just have different attributes you can consider.
Most of your emphasis should be placed on the quality of manufacture.
The bolt should be Mil Spec, 9310 steel or carpenter 158 and mpi tested. It should have quality machining and be properly fitted, shot peened, and heat treated by a US manufacturer. Some offer a limited lifetime warranty against defects. The carrier should be 8620 steel construction with a quality coating. Nickel boron, chrome, or quality nitride treatments are a benefit to lubricity and cleaning.
Muzzle Device.
Muzzle brakes mean a great deal to the competition shooters who want every edge in obtaining speed of target acquisition. If you are concerned more with muzzle flash you may want a flash hider, or birdcage device. Also many hybrid variants will do a little of both. For example If you set up a rifle for distance with a bipod, and you’re shooting prone, some muzzle devices will cause a blast of dirt and dust preventing a speedy follow up shot. In that case you may want to consider a muzzle brake with the most top porting to maximize downward vented muzzle blast.
Charging handle.
Don’t ignore your charging handle. It’s often difficult to grasp the handle at certain positions, or when using some mounted optics. An ambi-charging handle, lower profile handle, or side charger can offer a definite advantage in these situations.
Hand guard.
You can be very creative when deciding on your hand guard or keep it simple. This is where you can really dress it up and customize it any way you want. There’s an infinite selection of designs or custom creations that are available to you. Just make sure you have the length you want for your mounted components like grip, Picatinny rail, light, front post, and bipod.
Assembly.
Finally It’s important to give attention to detail when you’re ready to begin the rifle assembly. Here are a few tips to remember prior to actually building an AR-15. It’s best to pre-fit all components, receivers, controls, and detents to guarantee easy assembly at every step of the process. Checking headspace and any fine fit adjustments and reaming should be done at this time.
The barrel extension can be trued to the upper receiver using a receiver lapping tool. A small amount of quality anti-seizing agent and non permanent thread locker can be applied to the upper receiver threads, barrel extension, and barrel nut threads prior to fitting. That way you can disassemble it in the future without direct high heat and a five foot long cheater bar. Don’t worry; If it’s been torqued to specs, it won’t loosen on it’s own.
With a new upper receiver, it’s a good practice to pre stretch the threads by torquing the barrel nut several times to ensure an accurate torque reading. Each manufacturer has a recommended minimum and maximum, usually between 40 and 80 lbs.
No specialized tools are needed for the lower assembly, but AR specific gunsmithing tools will make it easier. The upper and barrel assembly should be installed while on a reaction rod or vice block, as some of the installation steps like torquing the barrel nut can be extremely difficult or impossible without it.
